
 How to Adjust Your Table Shuffleboard
Shop ZieglerWorld.com For All Your Table Shuffleboard Needs!
Convex Table Adjustment (Hump)
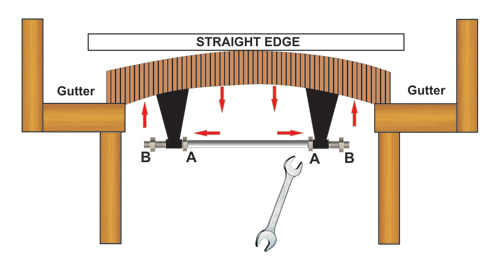
To Adjust Convex (Hump)
- Loosen Nut B all the way on both sides.
- Tighten Nut A SLOWLY - a couple turns. Do the same to each side for uniform effect.
- Repeat process a few times, as necessary, allowing time in between (days) for change to fully take effect.
Concave Table Adjustment (Dip)
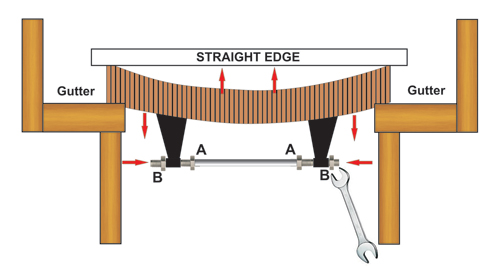
To Adjust Concave (Dip)
- Loosen Nut A all the way on both sides.
- Tighten Nut B SLOWLY - a couple turns. Do the same to each side for uniform effect.
- Repeat process a few times, as necessary, allowing time in between days) for change to fully take effect.
Thanks to John Henn for the following information on adjusting a board.
Keep this in mind while adjusting your table
These instructions can be used for a table in any condition but assume you are starting with a worse case where the table has not been properly adjusted for some time. Once a table is properly aligned you should only have to follow these instructions to make small adjustments once a month or so.
Shuffleboard tables are made of hardwood. Hardwood does not like to bend. If you force it you will break it. Because it is so stiff it will take days for it to settle in after an adjustment. If you measure the table two days after adjusting it you will see it has changed as the wood settled into the new position. Keep this in mind and don’t make big adjustments. Adjust a bit then come back at least two days later and do some more. Your patience will be rewarded and both you and your table will be happy for it.
You will need:
A two-foot level in very good condition and a good 6-foot level. You are using the 2-foot level as a straight edge in the warp adjustment and as a level later. If the edges of the level are not perfect it won’t work.
10 or so sheets of standard 20 Lb. white copy paper. It gets damaged during the measurements.
Wrenches. One or two open-ended wrenches to adjust the feet. If there is a locknut on the foot adjustment you need two. You need two wrenches to adjust the rods. You will need an open-ended wrench for the rod inside nut. I use a long, box end wrench and the open ended one at the same time to finish tightening the rod nuts. They need to be tight.
A can WD-40 or CRC.
Start
It is important to follow these instructions in the order listed. Vacuum and wipe all powder, dust, etc. from the table and gutters before starting to ensure accurate measurements. Then clean and polish the board.
Rod Nut Prep
Look up underneath the table and you will see several sets of brackets bolted to the bottom of the table. The one at our American Legion Post has five sets. Each pair is connected by a threaded rod with a nut on either side of the bracket locking the end of the rod to the bracket. I suggest putting a chalk mark on the opposite top rail directly above each rod to make them easier to locate during the adjustment process. You’re going to be up and down a lot and It’ll help save your knees.
Using a spray can of WD-40 or CRC, lightly spray the nuts and threaded parts of the adjusting rods on the side you are going to adjust. I suggest holding a rag under the rod as you spray each one then pat the excess off with the rag before moving to the next rod. Otherwise you could have a mess on the floor and you will be leaning in that mess while working. Just saying.
Level Lengthwise
Using a 6-foot level. Place the level lengthwise in the center of the board between each set of legs. Record how much the board is out of level at each set of legs. If you find the entire board is downhill in one direction, often the case, then look at the adjustment bolts on the bottom of the legs. If you can see an inch or more of the threads on the bolts then I suggest starting at the high end of the table and screw the bolts in to lower the high end. The further out the bolts are the less stable the table. Adjust each pair of legs by the same number of turns. No more than one full turn each time no matter how off it is. Each adjustment will affect the adjoining section. This may take a few passes but small adjustments are the way to get it right. Continue making passes from the high end to the low end till it’s level from one end to the other. Don’t tighten the locknuts if you have them as we will be adjusting the legs again later.
Adjust the Warp
Please read this part completely before you start.
The warp determines how much the weights curve towards the center, the outside or don’t curve as they travel down the board. The warp is affected by room humidity and will change quite a bit if you are in a climate where the indoor air is humid in summer and dry in winter. Unlike the other 5 sides, the bottom of the table is not sealed and the wood will absorb moisture in humid conditions causing only the bottom of the table to expand. This increases the warp. Dry conditions reverse the effect.
IMPORTANT! NEVER TURN ANY ROD NUT MORE THAN ONE FULL TURN WITHIN A TWO-DAY PERIOD. And not more than one half turn each pass. Otherwise you will split and destroy your table.
NOTE: The number of sheets of paper used as a gauge is optional. The more sheets, the more warp. Less paper, less warp. To obtain accurate measurements, you must use at least one sheet which will give you a very flat table. I suggest starting with 2 sheets.
Keep It Clean. The table, the level and the paper must be very clean. One grain of wax will throw this measurement way off.
Warp Adjustment
Contrary to some instructions, you only need to adjust one end of the rod. Adjust the end that is easiest to get to. It makes no difference what end you adjust, you are still lengthening or shortening the rod. If you need to adjust the rod a lot over time then you can loosen, then tighten one nut on the other side to remove any tension.
Starting at one end of the table, place the two-foot level across the table top directly over an adjusting rod (this is where the chalk mark is handy) with 2 sheets of paper centered and between the level and table top. Push lightly down on the level and pull on the paper. There should be a slight bit of drag on the paper as you pull on it. If the paper moves freely under the level there is too much warp. If the paper won’t move there is too little. The paper will get damaged after a while. Replace it when needed to be sure you have accurate measurements.
I’m going to go through the adjustments for too much warp. That is, the paper is very loose under the level. If it is too tight just reverse the instructions.
If the paper is too loose, you need to force the underneath brackets TOGETHER at that location. Loosen the INSIDE nut on the rod a quarter turn. If the nut still has tension then stop and go to the next paragraph. If it is loose enough to spin with your fingers, spin it in with your fingers a turn or two then check the outside nut. If the outside nut is also loose to start with then turn it with your fingers till it stops. Then use the wrench to first very, very lightly snug it up to the bracket. Then to give it a quarter turn in. (Clockwise)
Again, check with the level and paper. Adjust as above BUT ONLY TO A MAX OF A HALF TURN EACH PASS. Move to the next rod and repeat working from one end of the table to the other. Then return to the end you started at and repeat the process. Adjusting one section of the table will affect sections next to it. That is why we must take the time to adjust it a small amount each pass.
When you are done with the adjustments, tighten the nuts on the rods. Before tightening very lightly snug each nut up to the bracket. Then tighten both at the same time by equal amounts. Make sure you check the warp with the level and paper after tightening the nuts. It WILL often change when you tighten them.
Remember that you should only adjust any single rod nut a max of one full turn every two days. This gives the wood a chance to “settle in”. Forcing the wood more than that can result in permanently warping the table even if it does not split it.
LEVELING THE TABLE TOP
Place the two-foot level across the table top directly over each set of legs and see if the bubble is centered and note how far off center it is. If different sections are off in different directions you will need to adjust them over time as the table is twisted. If they are all off about the same amount then the table legs can be adjusted in one session but will take a few passes.
Go back to the starting set of legs and check it. If the bubble is not centered then gently pick up one end or the other of the level to center the bubble. Note how much space is under the raised end. Now turn the adjuster to lengthen the bolt on the low side, the side you had to raise the level on, about a half turn. Check with the level again and raise the level as you did before. This should give you an idea of how much turning the bold affects the table. NOTE: Do not adjust the leg more than one turn or to exactly level yet. Leave it a little off because adjusting the each set of legs will affect adjoining sets.
If you need to adjust sections of the table in different directions or if some parts are off more than others then only adjust the legs a max of one and a half turns each session.
NEXT
Wait two days and measure the table again. Don’t get lazy; Make sure it is clean before you start each session so you get accurate readings. If you had to adjust some of the legs more than one full turn you will likely have to adjust the warp again.
Once your table is properly adjusted you should only need to make small adjustments about once a month.
Copyright © 2017, John J. Henn