 Table Shuffleboard Building
Shop ZieglerWorld.com For All Your Table Shuffleboard Needs!
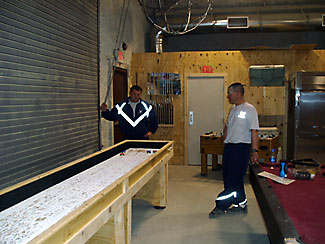
Here is some information and pictures about Todd Edelen's Afghanistan project.
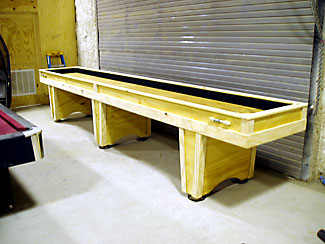
Here are a couple of pics that I took of the table that I built while deployed to Afghanistan. I had planned on staining all of the trim in a dark walnut or other similar dark stain and leave all of the remaining parts natural in color with just a coat of poly on them. I did have some poly, but my stain didn’t get there until late in my deployment and I never got the time to stain it. Here's a little info on the table:
• I followed your plans to the letter for the most part and had no problems at all building a 16’ long table.
• I used ¾” plywood for most of the construction and trimmed it out with ¾” pine. The plywood that we got over there actually had a decent finish on it so it looked nice.
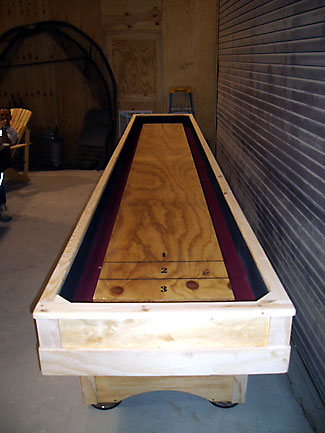
• Since we did not have any hardwood there to build the table top, I used a sheet of ½” plywood sandwiched by two sheets of 1” plywood. I alternated the joints by centering my ½” sheet over the joints of the 1” sheets to help with strength and used plenty of wood glue and some fat (yes, that’s a technical term) 2” long wood screws to hold it all together. I covered the table top in several coats of Afghan brush-on-poly. Then several coats of spray can poly that was a little better in quality.
• I bartered for an old pool table that was broken and used the dark maroon felt from that for the lining of the table, then found some other black fabric to line the sides.
-the feet came from that same broken pool table and I acquired a couple of others pool table feet to round out the rest of the legs
• I added an abacus to each end that I made from an old paint roller and some washers that were half painted blue and the other half left their natural color. Looking back, I should have made every 5th one the next size larger washer for ease of movement.
• I rounded it all out with a set of large table pucks, six pack of #2 wax and a set of bowling pins, which one of the guys painted to look like real bowling pins.
All in all it took me about 50 hrs to complete mainly working a few hours at a time on it, with a lot of that time just getting tools out and getting started, then clean up and putting everything back. For the most part, I built this by myself, only a little help moving it around when it got too big for one person to move. I used tools that you would expect to have on hand if you were taking on a project like this: 10” table saw, pneumatic nailers, 12” miter saw, biscuit joiner, orbital sanders and such. Like I said, I followed the directions practically word for work and didn’t have any problems with the construction. I think it turned out excellent and it got a lot of nice comments. Even had several people want me to build them one when we got back home. Of course that never happened, but I will eventually have one in my basement. Just need to find the time and money to get it started.
I wanted to send you a personal thank you for sending us these things out and giving us an opportunity for a little extra morale booster. It went over quite well and had folks waiting in line to play most every night. Play time tapered off a little toward the end, but it's still there for the next guys and the rotations that follow.
Thanks,
Todd